TLS
Deep diving into TLS is an item in my TODO list for a long time. But as you know, procrastination is not easy to overcome. The opportunity finally comes: I need to set up mTLS for a webhook endpoint for Zip. No way to bypass it now!
TLS seems intimidating for a beginner because there are multiple protocols involved.
- On the network side, TLS is built on top of TCP. So you need know a little bit about TCP. At least we should know that the first 3 packets at the beginning of a https request
SYN,SYN & ACKandSYNbelong to TCP, and then come with TLS handshake packets. Because we are dealing with binary packets, we need to know a bit about the binary protocol of TLS message schemas. - On the cryptography side, TLS uses asymmetric keys to verify server’s identity or even client’s identity if we use mTLS. This part requires some background in cryptography, such as how RSA works, how certificate is generated, and etc. This part involves binary protocols you probably never heard of. Cryptography is a difficult subject. The logistic is quite subtle such that the first time you think you understand it, the second time you may start to question some steps.
Anyway, complexity can only be transferred but does not disappear. There is no shortcut to understanding TLS. The good news is that Golang has a very concise cryptography related libraries crypto/tls. If you are willing to make your hands dirty and spend enough time reading the detailed implementation, you will master TLS. Let’s go then!
What did people say?
If I can find a good blog online that can resolve all my confusions about TLS, then I won’t write this article by myself. Learning from others is always the step before getting hands dirty by ourselves. The best article about TLS I found online is from Moserware. In his blog, he showed all details about the handshake process of TLS using Wireshark. Needless to say that he is an expert on this topic!
However, I could not follow his blog step by step because the TLS version he demonstrated is TLS 1.0, and I am using TLS 1.3. A lot of things changes from 1.0 to 1.3. For example, in his blog Moserware showed that the server sent its certificate to client after the ServerHello packet. He could read the certificate clearly in Wireshark, but I failed. I only received an encrypted sequence of bytes. I cannot even tell where the certificate starts in the response binary. OK. Not surprisingly, someone had similar doubt and posted his doubt online.
“All handshake messages after the ServerHello are now encrypted. The newly introduced EncryptedExtensions message allows various extensions previously sent in the clear in the ServerHello to also enjoy confidentiality protection”
Hmm. Things changed from TLS 1.2 to TLS 1.3. I felt a little discouraged to finish Moserware’s post. So that is why I decided to write this post.
TLS version history
Cryptography is about constructing and analyzing protocols that prevent third parties or the public from reading private messages.
Hmm. It seems TLS 1.4 will arrive in a few years. The key note I extracted out after reading TLS 1.3 specs is
TLS consists of two primary components: A handshake protocol and A record protocol
The handshake protocol is the core part of TLS and will be discussed in detail later. Here, we briefly go through the record protocol. Simply put, Record protocol is a collection of schema definitions used in handshake and the (de)serialization protocols used for these schemas. Chapter 3 “Presentation Language” provides details about how TLS data is serialized to bytes on the wire. Primitive types are simple. Meanwhile, composite types like vectors use a length + data serialization approach. See the description in section 3.4. When checking the Wireshark result, Wireshark shows the size followed by the content.
I have seen quit a few binary protocols so far, including protobuf, Thrift, kafka, TCP etc. They all serve the same purpose: build a binary contract for communication between two parties. The details are boring and there are lots of mature tools on the market that does (de)serialization for you, so you do not need to burn your brain to decode the byte sequence by yourself. But I find it is a tiring to learn such protocols from time to time.
There are only 4 different records in TLS: handshake, application_data, alert, and change_cipher_spec. I copied the schema definitions below.
1
2
3
4
5
6
7
8
9
10
11
12
13
14
15
enum {
  invalid(0),
  change_cipher_spec(20),
  alert(21),
  handshake(22),
  application_data(23),
  (255)
} ContentType;

struct {
  ContentType type;
  ProtocolVersion legacy_record_version;
  uint16 length;
  opaque fragment[TLSPlaintext.length];
} TLSPlaintext;
Wireshark does a good job in deserializing the bytes to these structures for you.
Some tools
Wireshark
Installation
I went to the official website https://www.wireshark.org/ and downloaded the version for my laptop MacOS Arm. Then open the download folder and double click the image and drag it to application folder.
Usage
Open Wireshark using sudo sudo /Applications/Wireshark.app/Contents/MacOS/Wireshark. Set the filter and hit the Start Capture button.

Meanwhile, make a https request.
1
2
3
4
5
6
7
8
9
10
11
12
13
14
15
16
17
18
19
20
21
22
23
$ curl -v -X POST 'https://webhook-staging.ziphq.com/api/infra/2' --header 'x-api-key: xxx' --header 'Content-Type: application/json' --data-raw '{"payload": {"a": 1}}'
*   Trying [2606:4700:3108::ac42:2bc0]:443...
* Connected to webhook-staging.ziphq.com (2606:4700:3108::ac42:2bc0) port 443 (#0)
* ALPN: offers h2,http/1.1
* (304) (OUT), TLS handshake, Client hello (1):
*  CAfile: /etc/ssl/cert.pem
*  CApath: none
* (304) (IN), TLS handshake, Server hello (2):
* (304) (IN), TLS handshake, Unknown (8):
* (304) (IN), TLS handshake, Certificate (11):
* (304) (IN), TLS handshake, CERT verify (15):
* (304) (IN), TLS handshake, Finished (20):
* (304) (OUT), TLS handshake, Finished (20):
* SSL connection using TLSv1.3 / AEAD-CHACHA20-POLY1305-SHA256
* ALPN: server accepted h2
* Server certificate:
*  subject: C=US; ST=California; L=San Francisco; O=Cloudflare, Inc.; CN=ziphq.com
*  start date: Apr 28 00:00:00 2023 GMT
*  expire date: Apr 26 23:59:59 2024 GMT
*  subjectAltName: host "webhook-staging.ziphq.com" matched cert's "*.ziphq.com"
*  issuer: C=US; O=Cloudflare, Inc.; CN=Cloudflare Inc ECC CA-3
*  SSL certificate verify ok.
...
I forced curl to use IPv4 -4 or --ipv4 because I am not familiar with ipv6 header structure. Also, the output shows the steps in a TLS handshake.
Then Wireshark showed the TCP packets. Regular TCP and TLS packets interleaved. The first 3 packets are TCP 3-way Handshake. Then after that, client and server negotiated the cryptography algorithms and client verified server’s certificate.
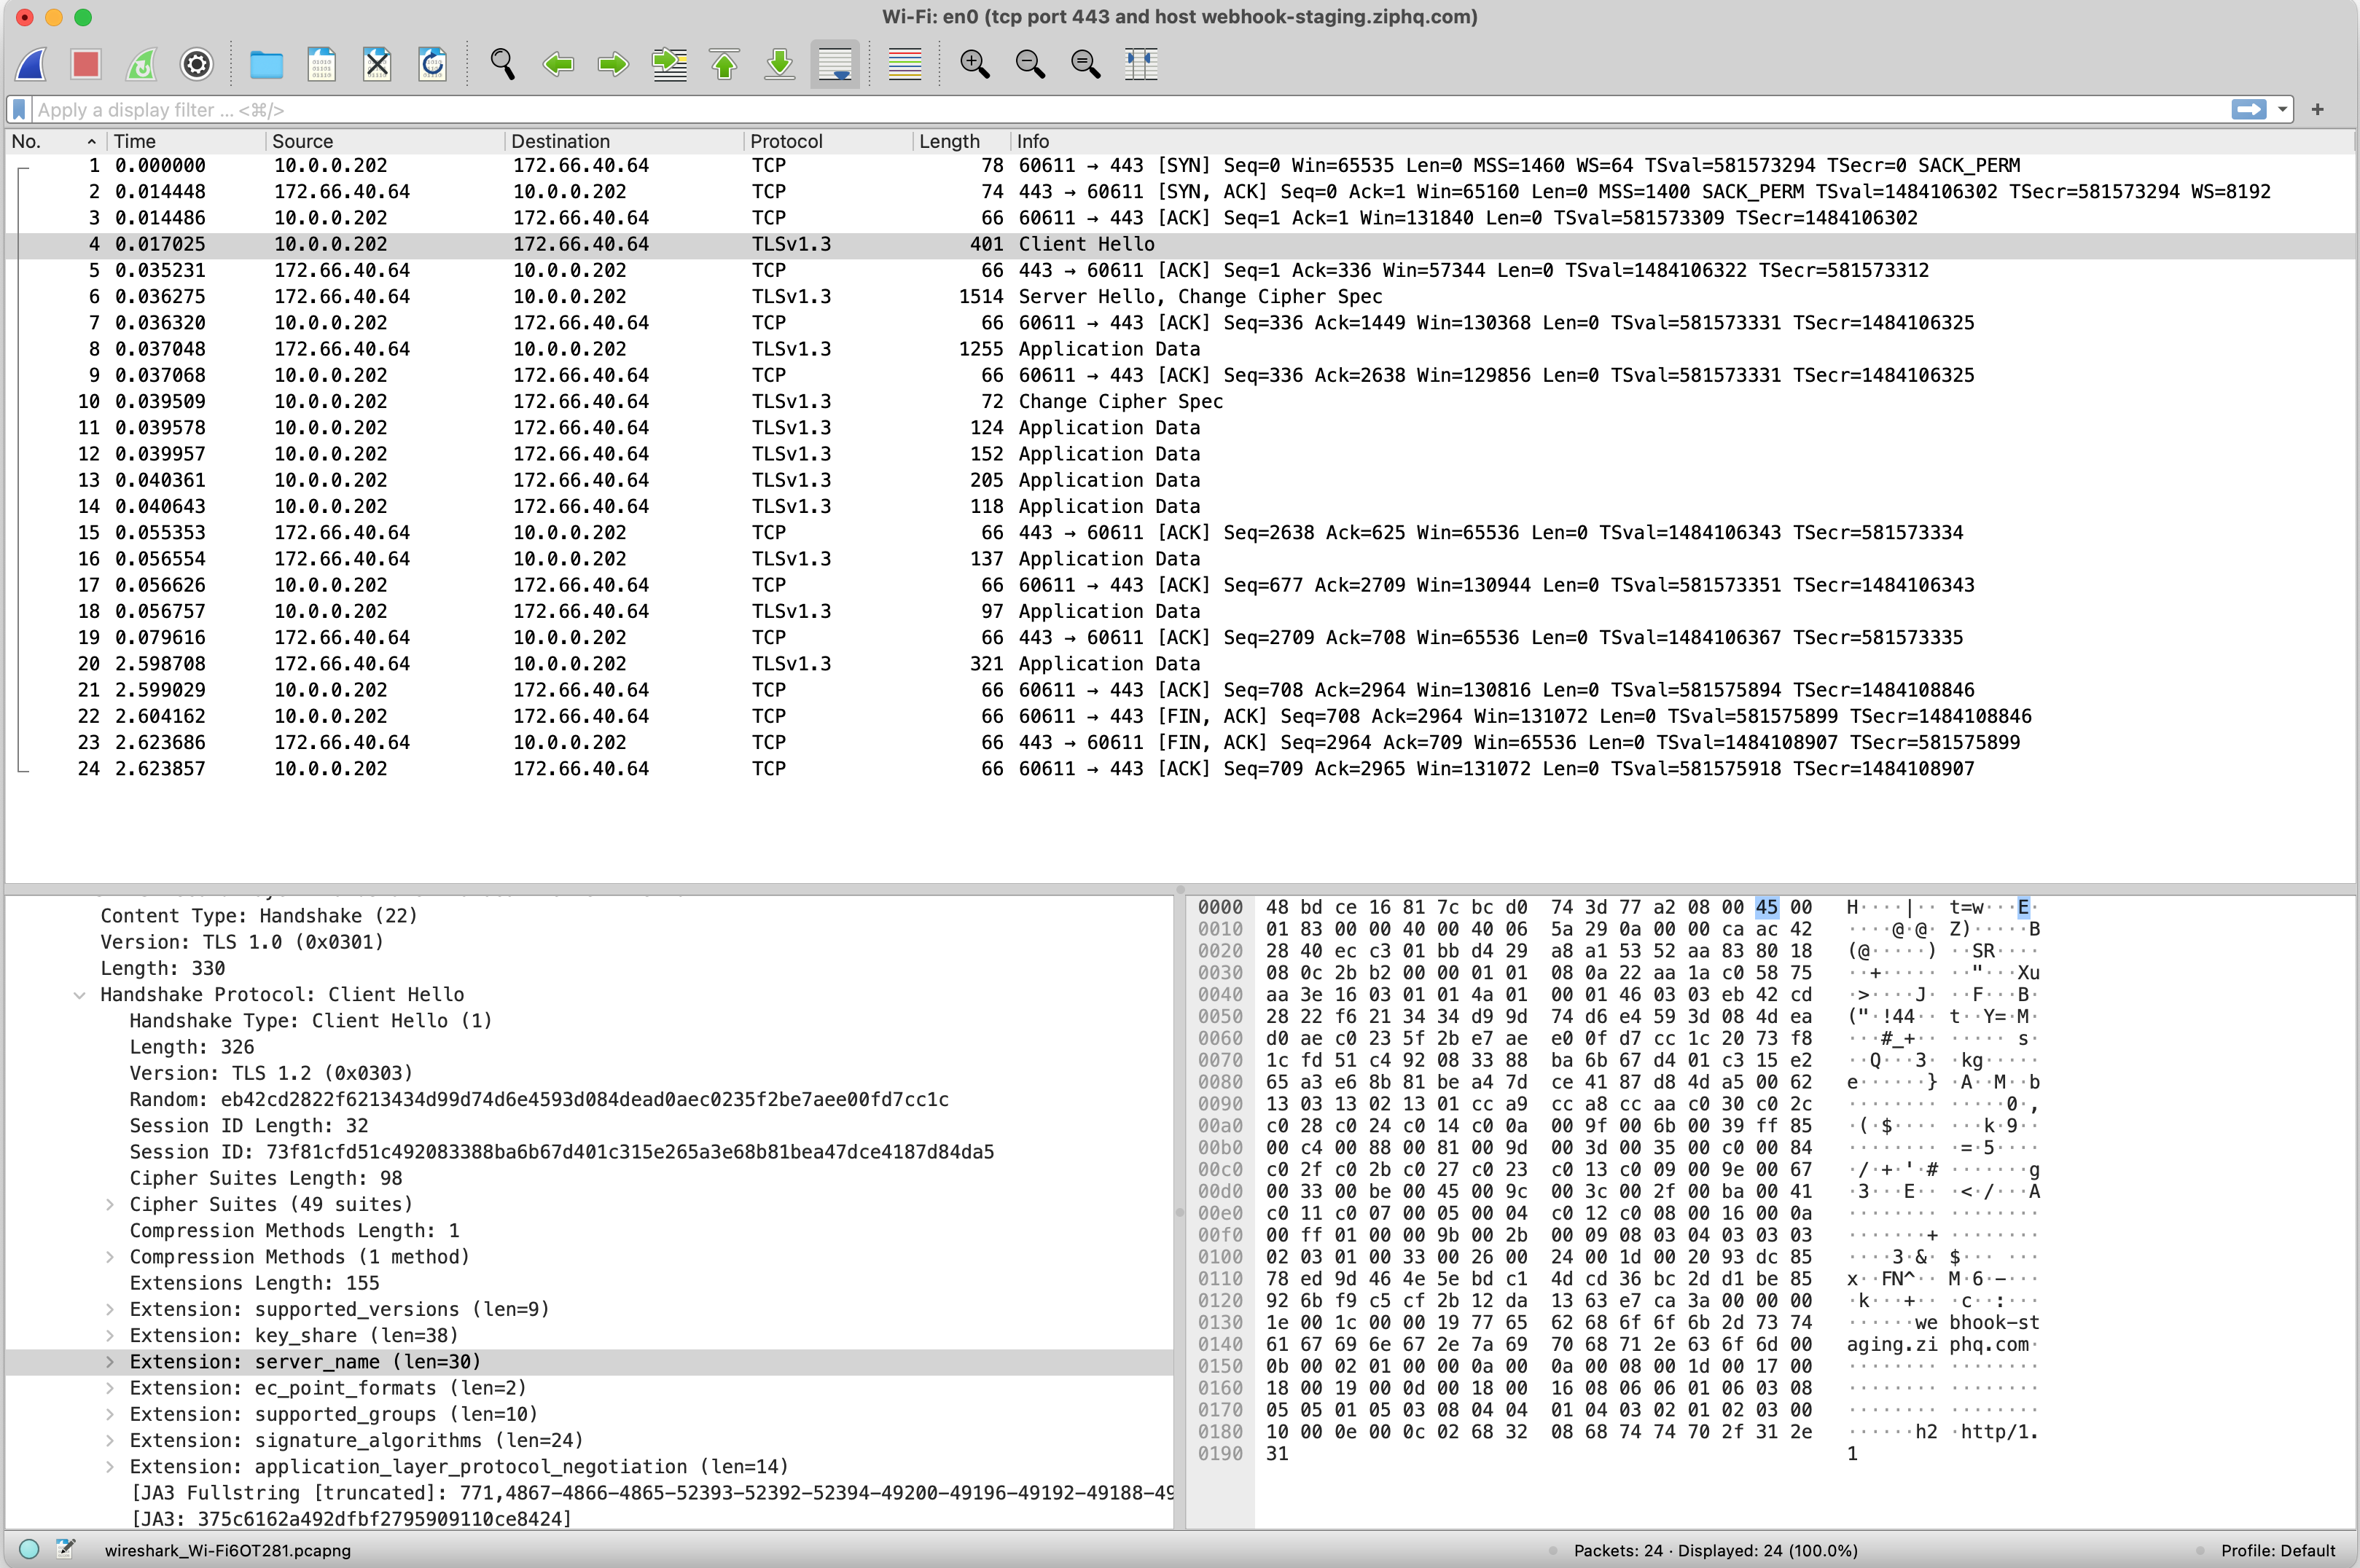
Let’s take a closer look at the packets. A network packet has format as below
1
2
3
|<-- Ethernet header -->|<--                   Ethernet body                -->|
                        |<-- Ip header -->|<--          Ip packet body      -->|
                                          |<--  TCP header -->|<-- TCP body -->|
It is layers of layers of protocols. Each protocol layer is split into a header part and a body part. Specifically for the above message, Ethernet header is
1
2
3
48 bd ce 16 81 7c -> MAC destination
bc d0 74 3d 77 a2 -> MAC Source
08 00 -> Ethertype
I think there are some Preamble bytes before MAC destination bytes according to the protocol, but not sure why Wireshark does not display it.
The IPv4 header starts with 45 00. Here 4 means it is IPv4. If you see 6 then it is IPv6. 5 means the header has 5 32-bit blocks. Namely, IPv4 header has 20 bytes. The rest is the IP addresses, port numbers, etc.
Check out TCP header format by yourself.
tcpdump
If we do not have access to wireshark, then tcpdump is another option. Both wireshark and tcpdump are built on top of libpcap.
Below we only capture the handshake packets, and only the client hello message is shown.
1
2
3
4
5
6
7
8
9
10
11
12
13
14
15
16
17
18
19
20
21
22
23
24
25
26
27
28
29
30
31
32
33
34
35
36
37
38
39
40
41

$ sudo tcpdump -X "tcp port 443 and host webhook-staging.ziphq.com and (tcp[((tcp[12] & 0xf0) >> 2)] = 0x16)"

15:48:39.460847 IP 10.0.0.202.59334 > 172.66.43.192.https: Flags [P.], seq 3035635353:3035635870, ack 501278632, win 2060, options [nop,nop,TS val 370768872 ecr 1493848618], length 517
        0x0000:  4500 0239 0000 4000 4006 55f3 0a00 00ca  E..9..@.@.U.....
        0x0010:  ac42 2bc0 e7c6 01bb b4f0 1e99 1de0 e7a8  .B+.............
        0x0020:  8018 080c 1dd0 0000 0101 080a 1619 7be8  ..............{.
        0x0030:  590a 522a 1603 0102 0001 0001 fc03 0321  Y.R*...........!
        0x0040:  e97d e961 69b1 dddc 1fa7 395b 8c04 60d9  .}.ai.....9[..`.
        0x0050:  dea1 0c09 9e67 cef6 6903 c34f f43b 9020  .....g..i..O.;..
        0x0060:  643e e744 be63 2c60 e998 2ccf 009b 6c3f  d>.D.c,`..,...l?
        0x0070:  9c00 f3a3 0ba9 3ae7 c638 3a29 ee33 c998  ......:..8:).3..
        0x0080:  0024 1301 1302 1303 c02f c02b c030 c02c  .$......./.+.0.,
        0x0090:  cca9 cca8 c009 c013 c00a c014 009c 009d  ................
        0x00a0:  002f 0035 000a 0100 018f 0000 001e 001c  ./.5............
        0x00b0:  0000 1977 6562 686f 6f6b 2d73 7461 6769  ...webhook-stagi
        0x00c0:  6e67 2e7a 6970 6871 2e63 6f6d 0017 0000  ng.ziphq.com....
        0x00d0:  ff01 0001 0000 0a00 0800 0600 1d00 1700  ................
        0x00e0:  1800 0b00 0201 0000 2300 0000 0d00 1400  ........#.......
        0x00f0:  1204 0308 0404 0105 0308 0505 0108 0606  ................
        0x0100:  0102 0100 3300 2600 2400 1d00 2069 32a5  ....3.&.$....i2.
        0x0110:  381b 2c50 7198 8df6 1ad5 aa75 7d5b 1843  8.,Pq......u}[.C
        0x0120:  227f ef1c 5eba a4e9 4e38 91f5 7000 2d00  "...^...N8..p.-.
        0x0130:  0201 0100 2b00 0908 0304 0303 0302 0301  ....+...........
        0x0140:  0015 0016 0000 0000 0000 0000 0000 0000  ................
        0x0150:  0000 0000 0000 0000 0000 0029 00db 00b6  ...........)....
        0x0160:  00b0 579a e8cc 1e40 fcaf eb1e d48b acc3  ..W....@........
        0x0170:  b27d 0452 91e7 8804 01b5 da1e 3c29 bd9a  .}.R........<)..
        0x0180:  442a a574 3863 4796 2494 12af 0aa4 adfa  D*.t8cG.$.......
        0x0190:  fa1d 08ba 0555 3d23 540f c6e8 ea14 a1e6  .....U=#T.......
        0x01a0:  a354 ca72 d59d e31d 91ef f62e d2cf f7c1  .T.r............
        0x01b0:  41f2 9cfe bc9f 8f5b 57e9 0763 9304 f69d  A......[W..c....
        0x01c0:  d4c6 78e5 73b0 4fac 92c7 b63b 2932 438d  ..x.s.O....;)2C.
        0x01d0:  4b07 82ea 4b67 8034 4167 5bcc 2717 b041  K...Kg.4Ag[.'..A
        0x01e0:  f597 9ea1 c591 de68 9dd8 7d14 6ed5 7b57  .......h..}.n.{W
        0x01f0:  de85 2560 3363 e8da cac1 1a73 6762 c576  ..%`3c.....sgb.v
        0x0200:  7186 ec79 17ae 22b3 2baa 79c6 2a48 a9a4  q..y..".+.y.*H..
        0x0210:  b021 2220 9b92 0021 20f6 f8ff 9ba3 0de3  .!"....!........
        0x0220:  b180 990a 3d87 cdcb c3b9 e511 c074 c71c  ....=........t..
        0x0230:  4295 7c1e 227f 766f 57                   B.|.".voW
        ...
How to read tcpdump bytes output? Each row has 16 bytes arranged in 8 words. The left most column is the index of starting byte of this row. For example, the last row index 0x0230 means the first byte of last row has index 2*16^2 + 3*16 = 560.
Note the packet starts with 4500, which is the starting bytes of an IPv4 header. This is different from Wireshark’s result. Tcpdump does not show Ethernet header.
Let’s decompose the bytes into sections
1
2
3
4
5
6
        0x0000:  [4500 0239 0000 4000 4006 55f3 0a00 00ca
        0x0010:  ac42 2bc0]
        0x0010:             [e7c6 01bb b4f0 1e99 1de0 e7a8
        0x0020:  8018 080c 1dd0 0000 0101 080a 1619 7be8
        0x0030:  590a 522a]
        0x0030:             [1603 0102 0001 0001 fc03 0321
TCP header starts at e7c6. Meaning of each field in TCP header:
e7c6 = 59334: source port number01bb = 443: destination port numberb4f0 1e99 = 3035635353: sequence number1de0 e78a = 501278602: Acknowledgment number8018:8: represents data offset in 32bits. So data offset is at 32 bytes.0: reserved, must be 0.18: flags.
TCP data starts at 1603. Probably need to remember 0x01bb = 443.
Handshake
Client Hello
client hello https://datatracker.ietf.org/doc/html/rfc8446#section-4.1.2
1
2
3
4
5
6
7
8
9
10
11
12
13
14
15
      uint16 ProtocolVersion;
      opaque Random[32];

      uint8 CipherSuite[2];    /* Cryptographic suite selector */

      struct {
          ProtocolVersion legacy_version = 0x0303;    /* TLS v1.2 */
          Random random;
          opaque legacy_session_id<0..32>;
          CipherSuite cipher_suites<2..2^16-2>;
          opaque legacy_compression_methods<1..2^8-1>;
          Extension extensions<8..2^16-1>;
      } ClientHello;
Random field no longer has the UTC time.
Server Hello
ServerHello message chooses the CipherSuite and replies to client. Meanwhile, server needs to present its certificate to client. As a newbie, I have no idea how a server obtains his certificate, so let’s deviate to the topic of certificate creation for a while.
A certificate is created in 3 steps.
Step 1: create a private key
1
2
3
4
5
6
$ openssl genrsa -out server.key 2048

$ cat server.key
-----BEGIN RSA PRIVATE KEY-----
        ...
-----END RSA PRIVATE KEY-----
Github reminds me of the security issue of displaying secret key as plain text, so I omit it. Though I do not care about this test key.
The file format of server.key is PEM(Private Enhanced Mail). Sometimes people use suffix .pem instead of .key. Basically, given a byte sequence, we first transform it by base64, and then add a header and footer, we get a PEM file. The header is not like a free form string. It is more like an enum field. There are only a few headers used in cryptography. Besides RSA PRIVATE KEY, we will see CERTIFICATE and CERTIFICATE REQUEST later in this post.
What are the bytes before base64 transformation? That is another encoding called DER (Distinguished Encoding Rules). It is used to serialize schemas/types defined in ASN.1 language. ASN.1 is similar to protobuf. We write schemas in .proto files then serialize them to bytes using the serialization library provided by protobuf. Here, schema is defined in ASN.1 and serialized using DER encoding. In this case, the schema is RSAPrivateKey.
1
2
3
4
5
6
7
8
9
10
11
RSAPrivateKey ::= SEQUENCE {
 version Version,
 modulus INTEGER, -- n
 publicExponent INTEGER, -- e
 privateExponent INTEGER, -- d
 prime1 INTEGER, -- p
 prime2 INTEGER, -- q
 exponent1 INTEGER, -- d mod (p-1)
 exponent2 INTEGER, -- d mod (q-1)
 coefficient INTEGER -- (inverse of q) mod p
}
A Warm Welcome to ASN.1 and DER is a good blog post about this topic. Also, you can paste the base64 encoded string above to https://lapo.it/asn1js/ to check the original data structures. For the server.key above, the decoded RSAPrivateKey is 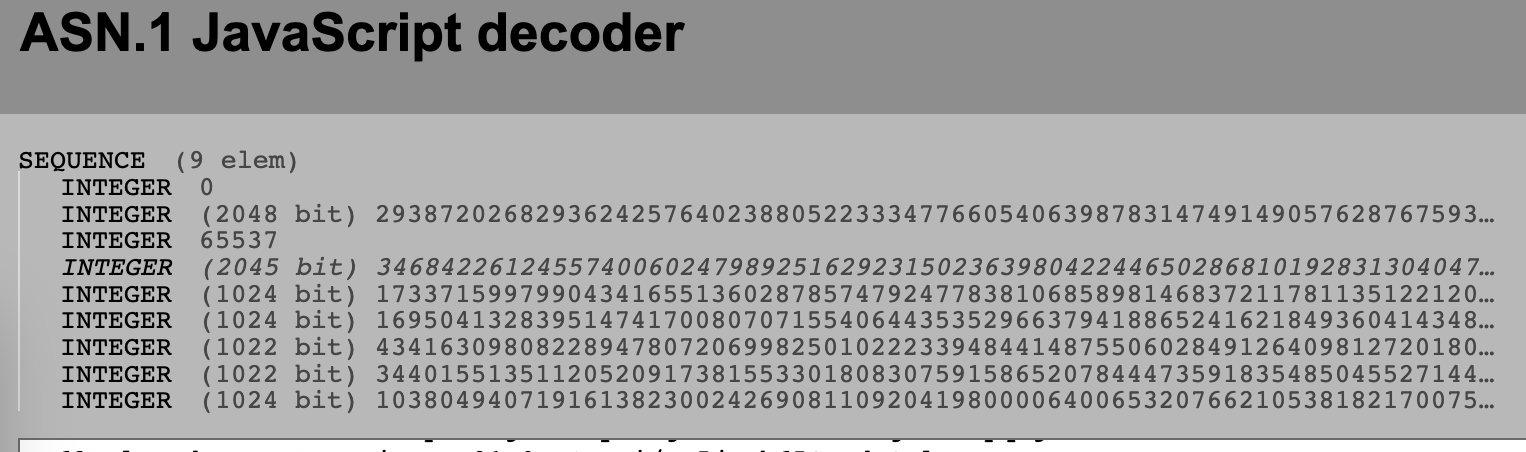
A randome rant: Golang’s DER implementation is here. This is why I love golang. Everything I need is already inside std, and is super concise. I can quickly learn the implementation details of the topics that I am interested in. If not golang, I probably need to dive into openssl and spend hours navigating around, reading huge functions, and getting lost in the details of openssl’s own implementations of string and array.
Ok. Come to the meaty part! What does these numbers n, e, d, p, q mean? Now it is the perfect time to introduce RSA encryption.
A crush course on RSA
CS265 SJSU is a crush course of RSA. The basic idea is a pair of formula
1
2
3
4
5
Let M = a message,
Let C = a ciphertext.

encrypt: C = M^e mod N
decrypt: M = C^d mode N
We use exponent e and modulus N to encrypt a message, and then we can only decode a ciphertext if we know the inverse exponent d. It is hard to get d from e using a brute-force method given N is very big number. But if N=pq and we know p and q then it is fairly easy. So in this sense, we should keep our p, q, d private. That that is why the above file is called private file. On the other hand, e, N should be disclosed to clients, and they are called public keys.
Let’s take a look at golang’s RSA implementation.
The encryption code is here. The decryption code is here. The main line is m = new(big.Int).Exp(c, priv.D, priv.N). They are exactly the formula above. Encryption uses public key. Decryption uses private key. Actually, there are another function in RSA called sign, that is signing a message to get the signature of this message. sign uses private key as well, and we will talk about it later.
Step 2: Generate certificate signing request (CSR)
After we have the private key, we need to ask CA to sign it.
1
2
3
4
5
6
7
8
9
10
11
12
13
14
15
16
17
18
19
20
$ openssl req -new -nodes -key server.key -out server.csr -subj /C=CN/ST=GuangDong/L=Guangzhou/O="Localhost Server"/CN=not-important

$ cat server.csr
-----BEGIN CERTIFICATE REQUEST-----
MIICpzCCAY8CAQAwYjELMAkGA1UEBhMCVVMxEzARBgNVBAgMCkNhbGlmb3JuaWEx
FjAUBgNVBAcMDVNhbiBGcmFuY2lzY28xDjAMBgNVBAoMBXppcGhxMRYwFAYDVQQD
DA1ub3QtaW1wb3J0YW50MIIBIjANBgkqhkiG9w0BAQEFAAOCAQ8AMIIBCgKCAQEA
yZkHOcDIcwKMQpZ52kMazjQPJqKJ/YsJ3NsvFO8A3E0pN3em5WYfNIif29Puv2N5
xBG4K1XZIdjBNa0Gu3oCuBxBN37TgexrQwmcQBofvG+0x7tXmR/PvIuUkp6y3UmY
Ps5EpOiYyT65w7kdwt+xzts36FCORxK1C0PVuedHMGYKWv7DkldEsjZv/VlUfnWl
sqph1+SsxrHd0HrTR4ulEEYoAeSu8w4DHNs6ID0+NJ4iAY0HXDwhQKEspTyq/H4n
WKU21PwhKMuYAi1o6NiKu3wj7S/oKbN/rO8qiMFLaH8+hzinUMcMcjgkDUg2TG/C
txPlR+XyJp/RSYN3iP75dwIDAQABoAAwDQYJKoZIhvcNAQELBQADggEBAFWAJzma
spk5AFPrwGjBYDMQyYrWJPfen3YfisS/xYTs07BIbqKHw6lKFkFGraCeoobu4fma
bYwASXKndwoaEw0rUy/PbIdd9Fm477a7zpJGMBQnE8TzkXzRBKpSzPcItu1U5Jvo
iopPevXo1e0bfKwDSA/L3AWGcYIj9KuAYy0seUsrzalCiiTGFpEYD/OOZ6IHnrbv
aUwmdrAwfi2W4W+idUopSJc687fSUVRhvv4sD8XstKHKYAseE0hrxRKS8gh+Tmr3
efOBMQIAUfnVQlQoVu7IJhQm1P91rJ6PtO52zPcupif3mCD/g9SuejppdXHDvJRZ
yIg6YSZQq7GyV84=
-----END CERTIFICATE REQUEST-----
The definition of CSR is in RFC2986. For easy of ready, I copy it below
1
2
3
4
5
6
7
8
9
10
11
12
13
14
15
16
17
CertificationRequest ::= SEQUENCE {
     certificationRequestInfo CertificationRequestInfo,
     signatureAlgorithm AlgorithmIdentifier,
     signature          BIT STRING
}

CertificationRequestInfo ::= SEQUENCE {
    version       INTEGER { v1(0) } (v1,...),
    subject       Name,
    subjectPKInfo SubjectPublicKeyInfo,
    attributes    [0] Attributes
}

AlgorithmIdentifier {ALGORITHM:IOSet } ::= SEQUENCE {
    algorithm          ALGORITHM.&id({IOSet}),
    parameters         ALGORITHM.&Type({IOSet}{@algorithm}) OPTIONAL
}
Using https://lapo.it/asn1js/ to decode it, we get below result:
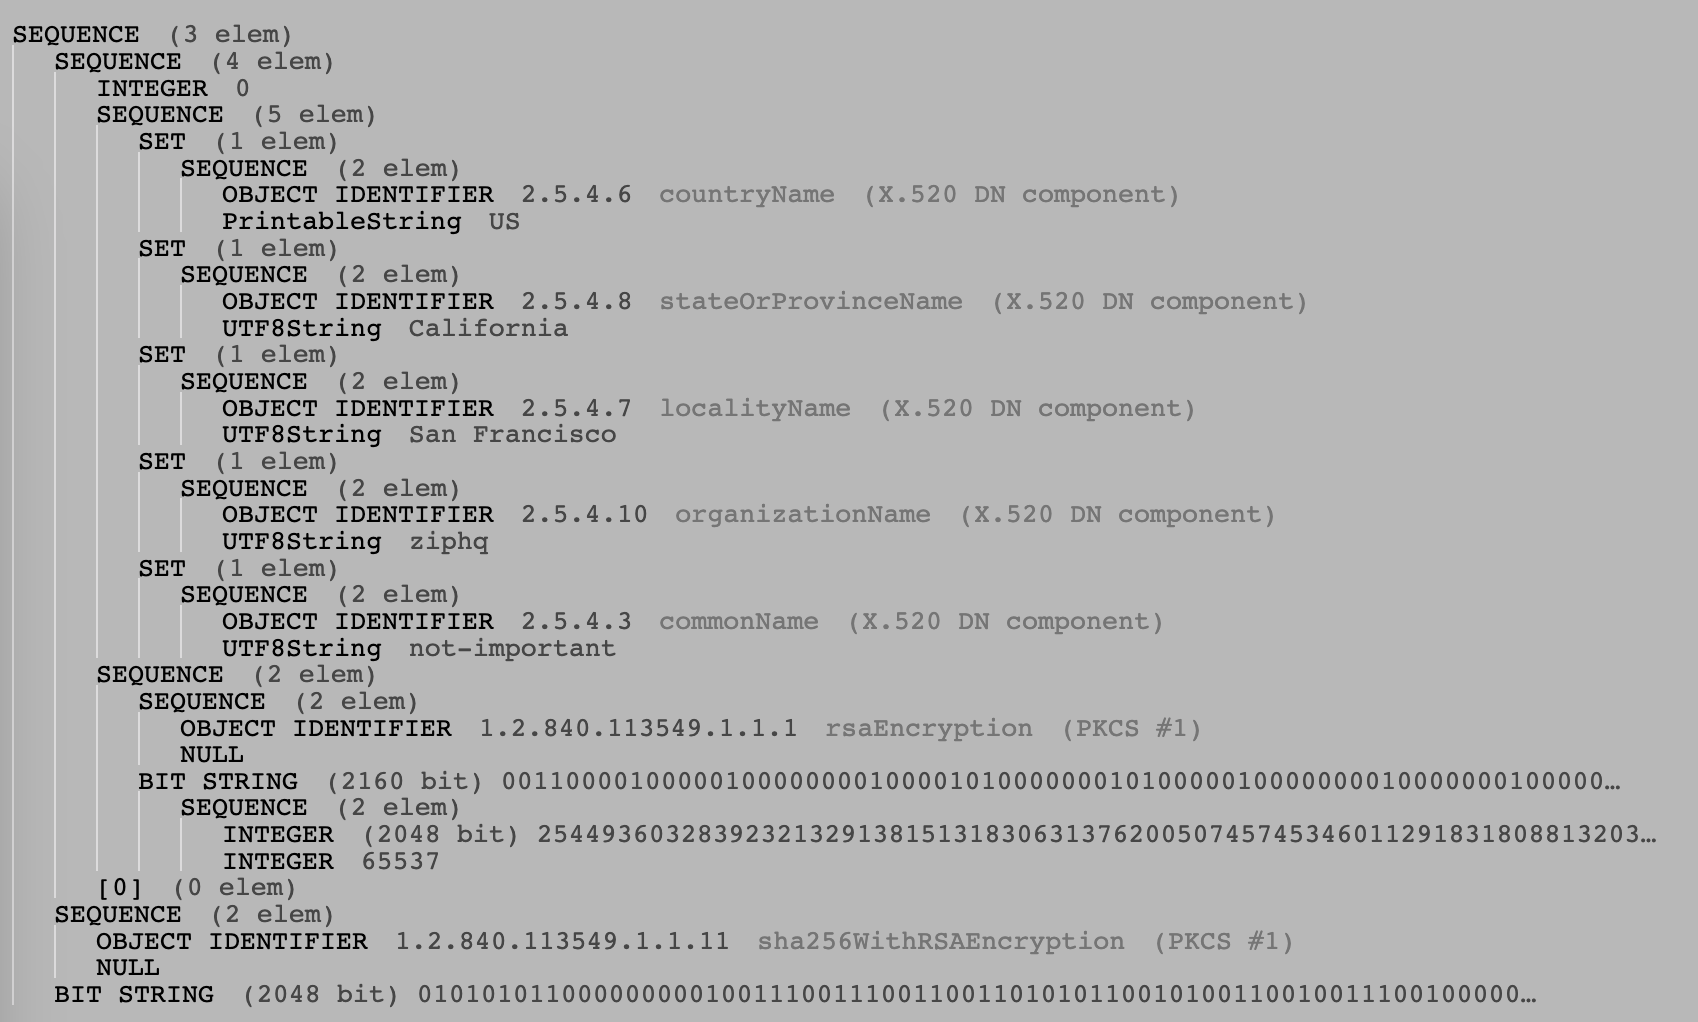
Field certificationRequestInfo contains business related info. Just to call out a few important fields:
- public key: the modulus
2544936...and exponent65537. - signatureAlgorithm:
sha256WithRSAEncryption. - commonName:
not-important. This field is very important. it must be the host name that the generated certificate is used with. - signature: bit string
01010101.... This signature is used to assure CA that the request indeed owns the private key corresponding to the public key in the folder.
Golang’s CSR struct definition is here and this function build a CSR. Let’s dive into the details of how the signature 01010101... is created in CSR.
CSR signature
Signature inside CSR is create by line signature, err = key.Sign(rand, signed, hashFunc). Here key in our case is a RSA key, and the implementation of Sign function is here.
1
2
3
4
5
6
7
func (priv *PrivateKey) Sign(rand io.Reader, digest []byte, opts crypto.SignerOpts) ([]byte, error) {
	if pssOpts, ok := opts.(*PSSOptions); ok {
		return SignPSS(rand, priv, pssOpts.Hash, digest, pssOpts)
	}

	return SignPKCS1v15(rand, priv, opts.HashFunc(), digest)
}
The normal case is the SignPKCS1v15. Basically, this function signs a message in two steps:
Step 1: prepare the buffer
The byte buffer structure is shown blow.
1
2
3
buffer:         | 0x00 | 0x01 | 0xff ... | 0x00 | prefix | hashed msg |
byte index:          1     2      3 ...
total lenght:   |<----          lenght of private key             --->|
There are a bunch of paddings and an algorithm specific prefix. The last part of this buffer is the hashed message. This buffer has the same length as the private key. Moserware in his blog spent extra time talking about this padded buffer and shown the bytes in Wireshark.
Step 2: decrypt
This part decrypts the above buffer and obtains the signature of this message. As we know, decryption uses private key, so as long as you have the corresponding public key, we can verify that this signature and be sure that the guy who generated this signature must know the private key.
This process is contrary to what I thought before diving into this topic. For a long time, I thought signature must be produced by some encryption process. But it turns out it is the opposite. Signature is generated by decryption and it is kind of a voice to the whole world:
Hey guys, this is my signature. Please come to verify it using the public key I distributed on internet. You will believe that I am the true owner of the private key. Even though I will never share the private key with you :)
Signature verification
Signature verification process is the reverse of signing a message. See this function. It eventually calls function VerifyPKCS1v15 which is the reverse of SignPKCS1v15 above. The signature of a CSR will be verified when CA uses this CSR to generate a certificate. But I did not find the verification step in golang’s crypto library :(. However, this stackoverflow answer uses this verification step before generating a certificate.
BTW, as a newbie in cryptography, for a long time, I thought signature and certificate are the same thing :(. Now, I understand that signature is just a long number. While certificate is usually a file containing a lot of information such as business address, issuer, root CA, validate time range, signature and etc.
Step 3: Sign it
This step should be done by CA. In our case, the CA root is also generated by us.
1
2
3
4
5
6
7
8
9
10
11
12
13
14
15
16
17
18
19
20
21
22
23
24
25
26
27
28
29
$ openssl x509 -req -in server.csr -CA ca.crt -CAkey ca.key -CAcreateserial -out server.pem

$ cat my_client.pem
-----BEGIN CERTIFICATE-----
MIIEYTCCAkkCAQEwDQYJKoZIhvcNAQELBQAwgYoxCzAJBgNVBAYTAlVTMRMwEQYD
VQQIDApDYWxpZm9ybmlhMRYwFAYDVQQHDA1TYW4gRnJhbmNpc2NvMQ4wDAYDVQQK
DAV6aXBocTEeMBwGA1UEAwwVemlwaHEgcHJpdmF0ZSByb290IENBMR4wHAYJKoZI
hvcNAQkBFg9pbmZyYUB6aXBocS5jb20wHhcNMjMwODA3MDQ0MzA5WhcNMzMwODA0
MDQ0MzA5WjBiMQswCQYDVQQGEwJVUzETMBEGA1UECAwKQ2FsaWZvcm5pYTEWMBQG
A1UEBwwNU2FuIEZyYW5jaXNjbzEOMAwGA1UECgwFemlwaHExFjAUBgNVBAMMDW5v
dC1pbXBvcnRhbnQwggEiMA0GCSqGSIb3DQEBAQUAA4IBDwAwggEKAoIBAQDJmQc5
wMhzAoxClnnaQxrONA8moon9iwnc2y8U7wDcTSk3d6blZh80iJ/b0+6/Y3nEEbgr
Vdkh2ME1rQa7egK4HEE3ftOB7GtDCZxAGh+8b7THu1eZH8+8i5SSnrLdSZg+zkSk
6JjJPrnDuR3C37HO2zfoUI5HErULQ9W550cwZgpa/sOSV0SyNm/9WVR+daWyqmHX
5KzGsd3QetNHi6UQRigB5K7zDgMc2zogPT40niIBjQdcPCFAoSylPKr8fidYpTbU
/CEoy5gCLWjo2Iq7fCPtL+gps3+s7yqIwUtofz6HOKdQxwxyOCQNSDZMb8K3E+VH
5fImn9FJg3eI/vl3AgMBAAEwDQYJKoZIhvcNAQELBQADggIBADEtycgtP00vc2Fn
pkhBrrO8SXBv3OG7tEJkKDudMWAmZipGrh2nEbUX4azqjVAAc/GCZQWP+ui97tny
RFelGTalPa7IIrJo5KT3YVTHeBYN1MLBssQFrpqN6FbvI26DEiUiXJV0b3lqmWs7
xIbGFwTX+r6bJK0HPOG93LRTV9oeaXQkBgaaHcWHOG5632Jr9XJJtyeMoTKCRNUA
r1cyj1i4Rg8DerQIAxIgjAM2MiKdrS9zX9VZq1hA7QwXjnVXoPy6SaytIuIYXMQs
dKXthPqOaJKOgQjlKLgFzQXXMIbg3fFZ0IZhMxCiJgOBcfJ7dypbOnSPCG9BFjnV
jLKRYCZa1q6xxqcTnZS1MoO4txG8drY602XYXOOs/aiWqI4+DjhfZR6LGR2DsiBE
NsoZ/xcVdSt8dJbzAHYHvBw7OQOjOpvHjDa91pEU0dTcfW4ZRCnyoK+izEvO5equ
0vAQdj62Ao3LBZGylRJcsCuLXOypBey8E78ZrHufYNyDQIeOeSMaxwKq/N9Fd0PA
DHbcXDr6DNIEnX8+OfDTA81L+B4WRwp6WBHI+UrwBE8+o7lKR12IWI/nC1kg5y0E
bd7yHB2hLB/LDDXkj93LhPxmMNxw9TKKEzk9I4fzyKpwk5bZmfSzCaLPQojs0jCD
8ZbHu+BIRMvLTszcWbSAaDkfl3Ca
-----END CERTIFICATE-----
Sorry, I lost my server.pem, so use my_client.pem as example. We can also check the content of certificate using
1
$ openssl x509 -noout -text -in 'my_client.pem'
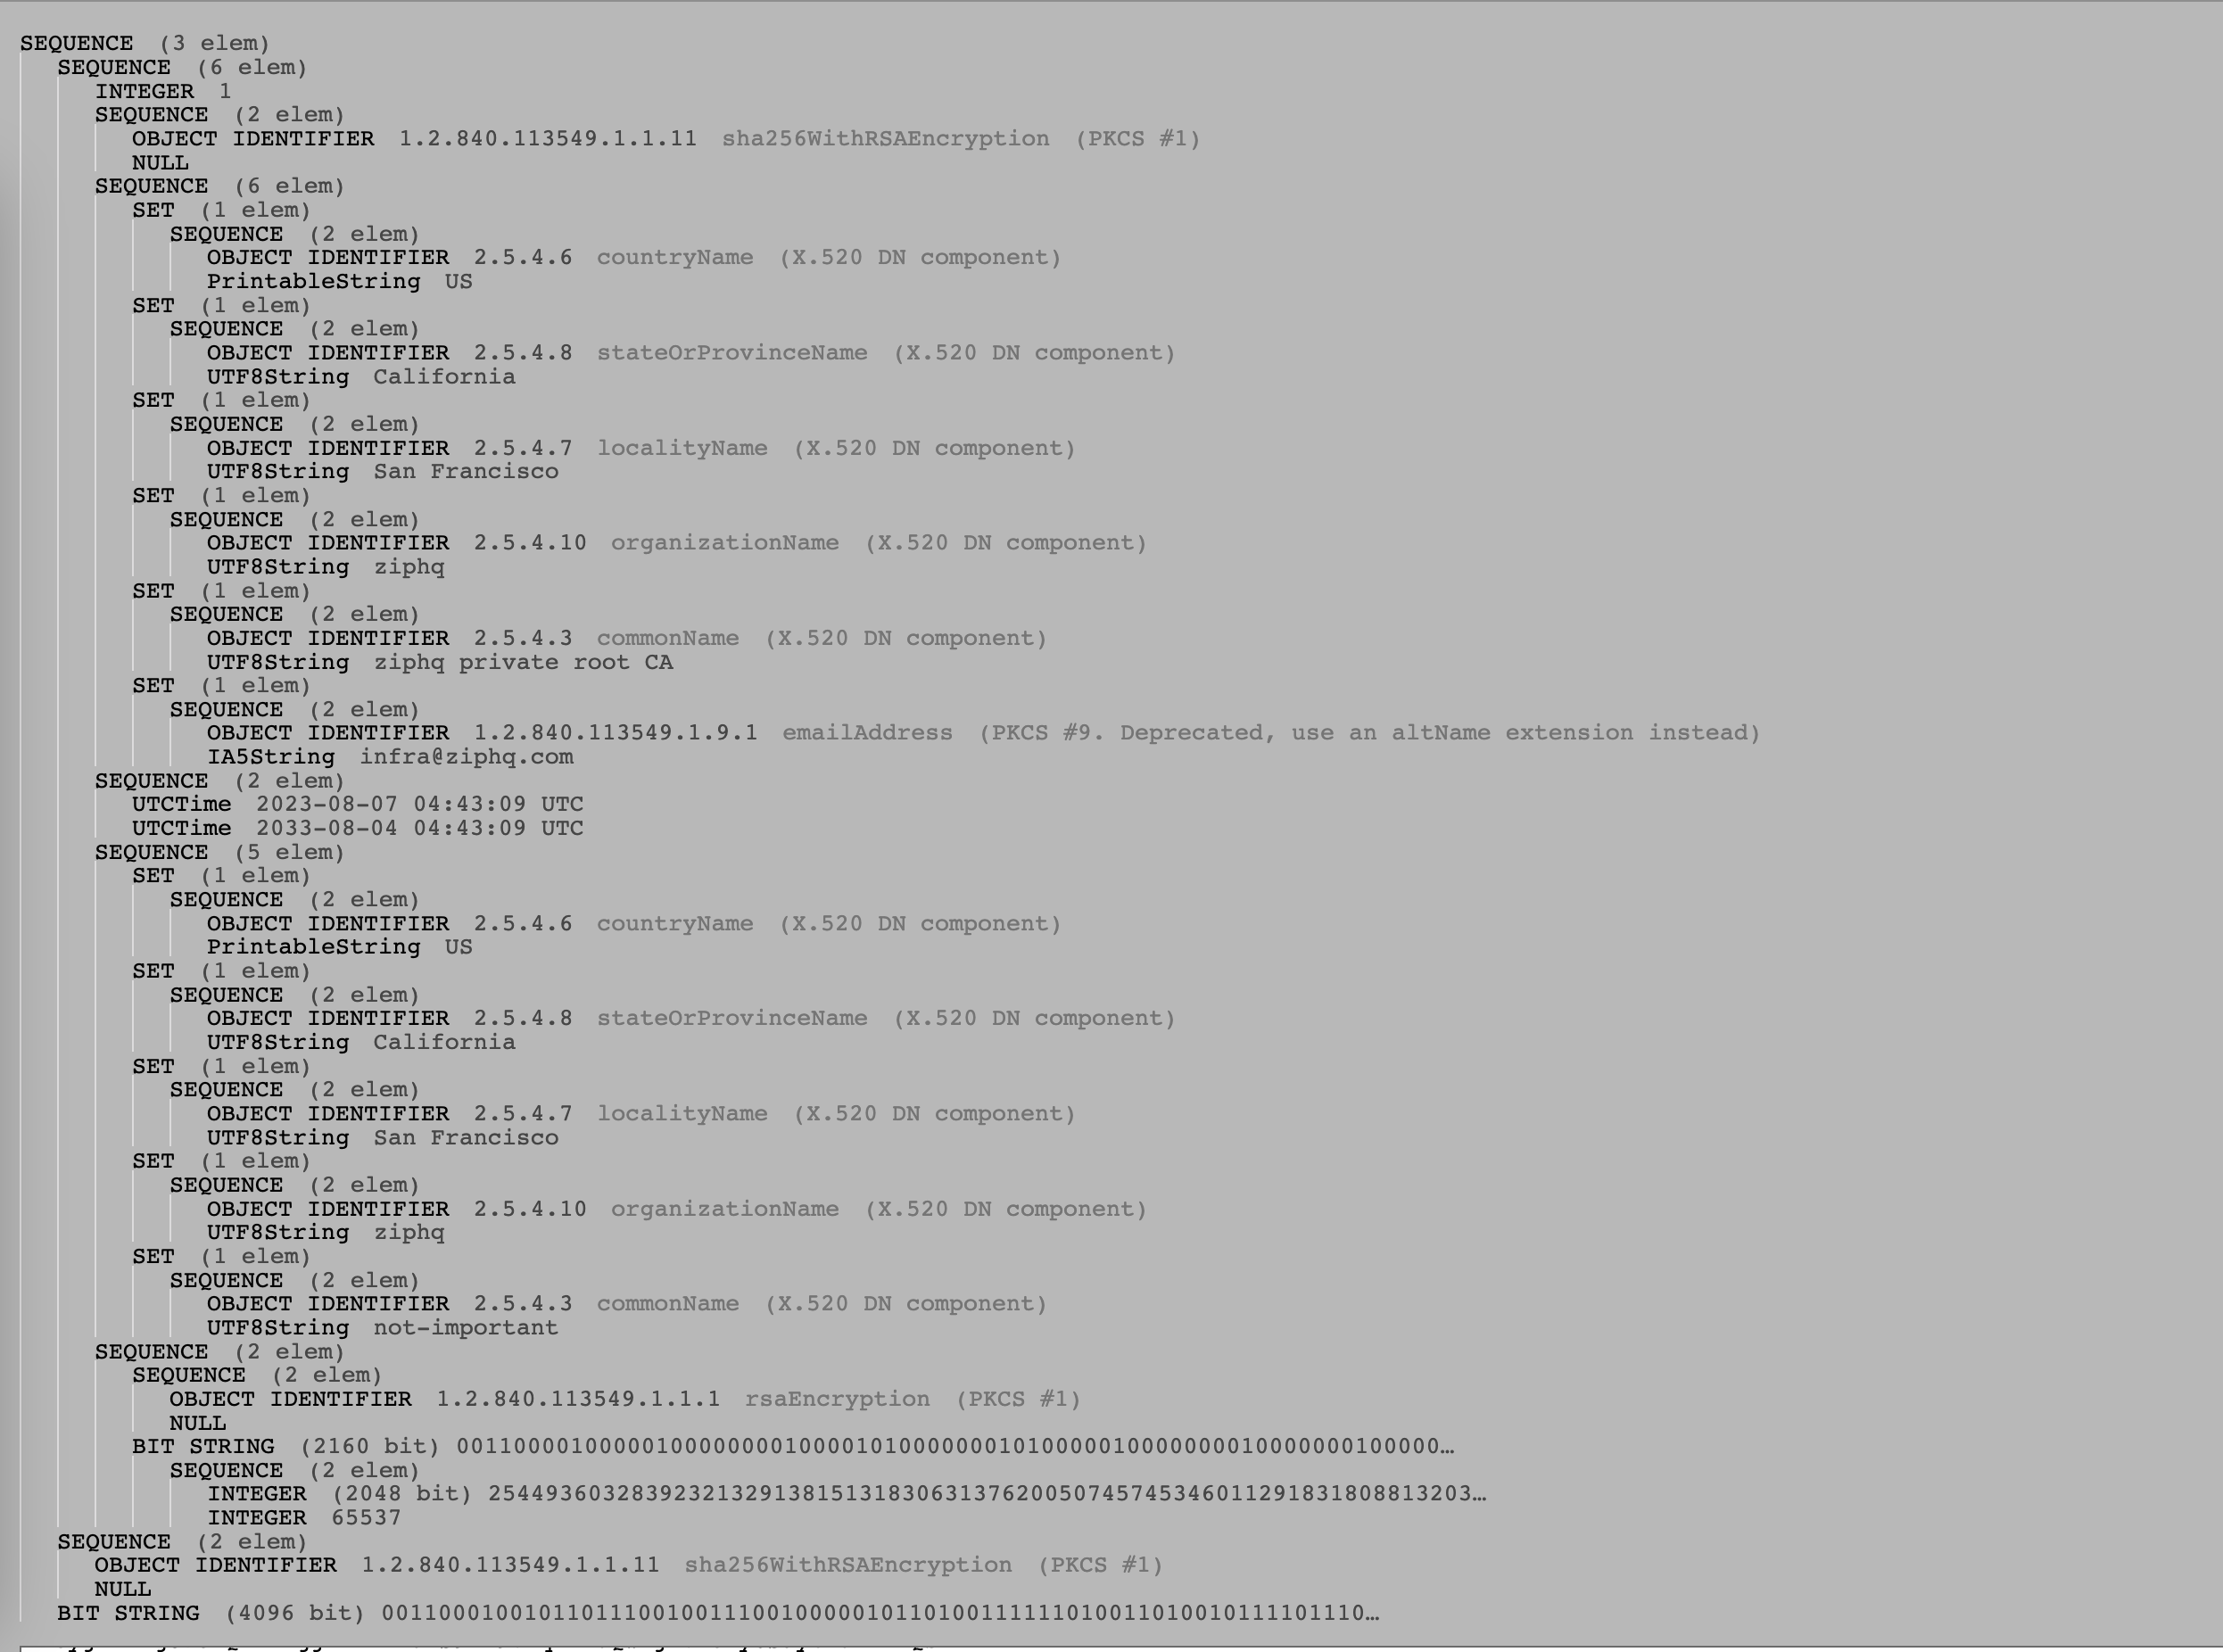
Certifiate format is defined in rfc5280, and is copied below:
1
2
3
4
5
6
7
8
9
10
11
12
13
14
15
16
17
18
19
20
   Certificate  ::=  SEQUENCE  {
        tbsCertificate       TBSCertificate,
        signatureAlgorithm   AlgorithmIdentifier,
        signatureValue       BIT STRING  }

   TBSCertificate  ::=  SEQUENCE  {
        version         [0]  EXPLICIT Version DEFAULT v1,
        serialNumber         CertificateSerialNumber,
        signature            AlgorithmIdentifier,
        issuer               Name,
        validity             Validity,
        subject              Name,
        subjectPublicKeyInfo SubjectPublicKeyInfo,
        issuerUniqueID  [1]  IMPLICIT UniqueIdentifier OPTIONAL,
                             -- If present, version MUST be v2 or v3
        subjectUniqueID [2]  IMPLICIT UniqueIdentifier OPTIONAL,
                             -- If present, version MUST be v2 or v3
        extensions      [3]  EXPLICIT Extensions OPTIONAL
                             -- If present, version MUST be v3
        }
A few notes about the fields in a Certificate:
tbsCertificatestands for “to be signed certificate”. Most fields are copied from the CSR file.subjectcontains the business information of this server, such as address, business name, (CN) common name, and etc. CN is probably the most important field because client will verify CN is the same as the host name it is connecting to. See more details here. By the way, there is also a field called Subject Alternative Name which serves as a supplement to CN. On the other hand, in mTLS, both server and client should present their certificates. Only server’s CN is verified, not client’s CN. So we can write anything to the CN field in a client certificate.issueris the organization that signs this certificate.issuehas the same type assubjectfield. It containsissuer’s business information. In most cases,issueris just one of the well known certificate authorities (CA).subjectPublicKeyInfois the public key of this certificate holder. It is not the public key of the issuer.signatureValueis the signature signed by the issuer’s private key.- You may notice that
AlgorithmIdentifierfield shows up twice. They should be the same. Checkout golang the certificate parser code here.
In golang, the certificate is created by CreateCertificate function. The above certificate is as blow inside https://lapo.it/asn1js/ .
A side note: we can use openssl to view the certificate of a server
1
$ echo | openssl s_client -servername www.example.com -connect www.example.com:443 2>/dev/null | openssl x509 -text
Certificate validation
After the client receives the certificate from server side, it validates it. Most time the certificate message from the server contains only one certificate. The client only needs to verify that this certificate is really signed by a well known CA. Basically, the client side has a pre-installed collection of CAs, and it tries to match each CA’s common name with the certificate’s issuer. It there is a match, the client uses this CA’s public key to verify the signature inside this certificate. If signature matches, then the client knows that this certificate is valid.
Sometimes, the certificates presented by the server may form a chain, say c1 -> c2 -> c3. c1 is the leaf certificate, and is signed by c2. c2 is signed by c3. When the clients receives these 3 certificates, it needs to verify this sign chain is valid and also s3 is signed by a well known CA.
Golang’s implementation is super easy to follow. I would recommend reading some key functions such as buildChains to have a better understanding about what I said.
Different implementations
Wikipedia list the different implementations of TLS. I want to know the common usages in different programming languages. In C/C++, probably everyone will turn to openssl. In Java, JSSE is the standard implementation that is bundled together with every Java version. In Golang, TLS is supported in std.
Golang
A good example is https://gist.github.com/xjdrew/97be3811966c8300b724deabc10e38e2/.
Java
If you are Java developer, you probably know keystore and truststore. These are PKCS12 file format. Cited from Wikipedia:
In cryptography, PKCS #12 defines an archive file format for storing many cryptography objects as a single file. It is commonly used to bundle a private key with its X.509 certificate or to bundle all the members of a chain of trust.
So basically, keystore and truststore are archives of CA, certificates, or private keys. You can think of a keystore is Map[alias, KeyStore.Entry]. Depending on the content of the entry, a keystore entry is classified into one of three different types: KeyStore.PrivateKeyEntry, KeyStore.SecretKeyEntry and KeyStore.TrustedCertificateEntry. See code.
The most common one is PrivateKeyEntry. It contains a private key and a certificate chain. It is usually loaded on the server side, and when the server needs to establish a TLS connection with a client, it displays this certificate chain to the client. This is the most commonly referred keystore.
A truststore is a special keystore that holds several trusted CAs. There is no specific class for a truststore. You can think of a truststore as a Map[alias, KeyStore.TrustedCertificateEntry]. Truststore is usually used on the client side. When the server sends its certificate chain to the client, the client verifies that the root CA of this chain is one entry inside its truststore. Checkout this function to see how Java extracts a list of trusted CAs from a truststore. Java ships with a default list of trusted CAs located at $JAVA_HOME/lib/security/cacerts.
To help users to manage keystores, Java provides a command tool keytool. Let’s see how to use it to create a keystore and a truststore.
1
2
# create a keystore.
keytool -keystore server.jks -alias localhost -validity 365 -genkey -dname "CN=kafka" -storepass test1234 -keypass test1234 -keyalg RSA
This keystore has only one alias ‘localhost’. This alias correspond to a KeyStore.PrivateKeyEntry. Note there are two passwords.
- keypass: the password used to generate private key. This is optional.
- storepass: keystore’s password. Each keystore is required to have a password with a minimal length 6. This password protects people from viewing the content of this keystore.
Also, -keyalg RSA is required. Even though this field has a default value, the default value is unlikely what you want. See JDK-8212111. I wasted a whole day when fixing some issue for kafka-python!
To view the content of a keystore, use keytool -list
1
2
3
4
5
6
7
8
9
10
11
12
13
14
15
16
17
18
19
20
21
22
23
24
25
26
27
28
29
30
31
$ keytool -list -keystore server.jks -storepass test1234 -v
Keystore type: PKCS12
Keystore provider: SUN

Your keystore contains 1 entry

Alias name: localhost
Creation date: Apr 7, 2024
Entry type: PrivateKeyEntry
Certificate chain length: 1
Certificate[1]:
Owner: CN=kafka
Issuer: CN=kafka
Serial number: f28036d7a0cc0fd8
Valid from: Sun Apr 07 11:41:45 PDT 2024 until: Mon Apr 07 11:41:45 PDT 2025
Certificate fingerprints:
         SHA1: 76:57:D1:A2:62:9D:F9:FB:11:4C:B1:72:98:E7:31:06:6B:37:AD:1C
         SHA256: 6C:8C:D0:0D:C2:38:0F:8D:F0:AB:B6:C7:14:78:8A:89:A4:61:13:5B:6A:5D:37:03:A0:09:26:4E:22:98:5F:2B
Signature algorithm name: SHA384withRSA
Subject Public Key Algorithm: 3072-bit RSA key
Version: 3

Extensions:

#1: ObjectId: 2.5.29.14 Criticality=false
SubjectKeyIdentifier [
KeyIdentifier [
0000: 74 F7 AA DC C8 F6 5F 17   9A A8 24 51 7E F7 44 41  t....._...$Q..DA
0010: CD 0A B0 93                                        ....
]
]
You notice that Issuer: CN=kafka, so it means this certificate is not signed by any CA. OK. Let’s create a CA and sign it.
1
2
3
4
5
6
7
8
9
10
11
12
# generate private key `ca-key` and CA root certificate `ca-cert`
openssl req -new -x509 -keyout ca-key -out ca-cert -days 365 -passout pass:test1234 -subj "/CN=Xiong"

# generate certificate signing request
keytool -noprompt -keystore server.jks -alias localhost -certreq -file server.csr -storepass test1234

# sign it
openssl x509 -req -CA ca-cert -CAkey ca-key -in server.csr -out server.pem -days 365 -CAcreateserial -passin pass:test1234

# Add the signed certificate back together with CA root certificate.
keytool -noprompt -keystore server.jks -alias CARoot -import -file ca-cert  -storepass test1234
keytool -noprompt -keystore server.jks -alias localhost -import -file server.pem -storepass test1234
Now, you will see two aliases in the server.jks. The localhost’s certificate has Issuer: CN=Xiong. Two things to call out. First, we use keytool to generate a certificate signing request. After we sign it, we add it back to the keystore with the same alias. This essentially replaces the old entry. Second, we also add the root certificate into keystore. From what I understand, root CA should not be put into the certificate chain. Not sure why we need it. TODO: figure it out.
Let’s see how to generate a truststore. Suppose we already generated ca-key and ca-cert above.
1
2
# create a truststore
keytool -noprompt -keystore client.truststore.jks -alias CARoot -import -file ca-cert -storepass test1234
Node, each alias can only be associated with one CA. If you try to import a CA with an existing alias, keytool returns below error.
1
keytool error: java.lang.Exception: Certificate not imported, alias <CARoot> already exists